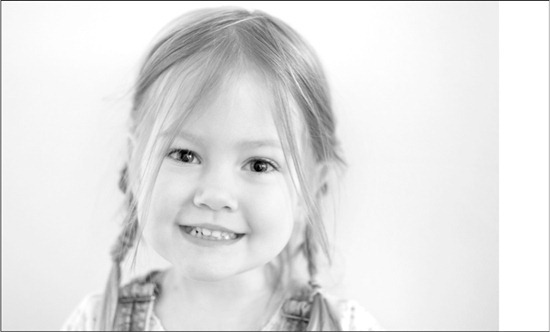
This month’s tutorial is going to be an in-depth look at a black & white photograph that was used in one of my tutorials on black & white conversion earlier this year. I recently showed this image at Beacon Camera Club, where I was a guest speaker, and they were very interested in the process so I thought it may be useful for you people in the ether to have a look too.
Looking at image 1 you may notice that although the conversion looks pretty straight forward the number of layers I’ve used suggests that there is slightly more going on than meets the eye.
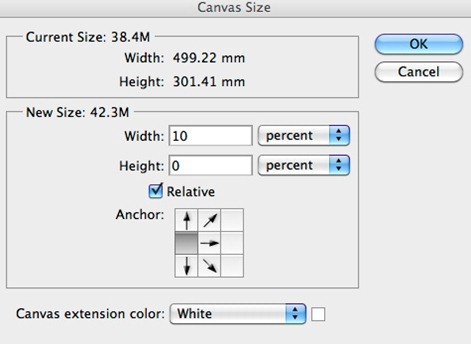
So down to business and the first thing I’ve done is expand the canvas size. To do this go to Image > Canvas Size or alt cmd C (Mac) alt ctrl C (PC). This brings up the canvas size dialogue box.
In the image I’ve used I wanted more space on the right hand side to give some negative space to balance up the composition. To do this you need to click on the arrow on the opposite side to the one you are expanding. Then change the width to one you want (you can go back and change the width until you get the one that works for you as its not a one-size-fits all thing). You can use a specific measurement ie. a measurement of 10mm will add that amount to the width or you can add a percentage of the total width via the drop-down. You can also choose the colour of the extension via the drop-down at the bottom of the box, in this case we choose white.
The next two layers are cosmetic changes. In layer one I have removed some the distracting hairs that fell across the face and eyes using the healing brush. In the layer above that I lightened the shadows under the eyes (this tutorial explains how to do this in more detail ). The next three images show the before version and then two with the changes applied.
Things get a little counter-intuitive now because the next two layers were applied after the black and white conversion was done. Its not unusual to do this sort of thing to get the conversion “right” by altering the underlying colours that are then converted into shades of grey. Tje Image below shows the image before the changes we made “underneath” it.
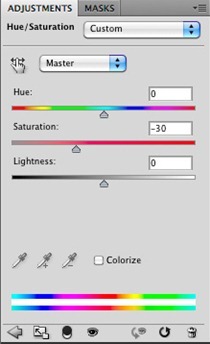
The following Image shows the photograph after we’ve reduced the saturation of the image via a Hue/Saturation layer to lighten parts of the image.
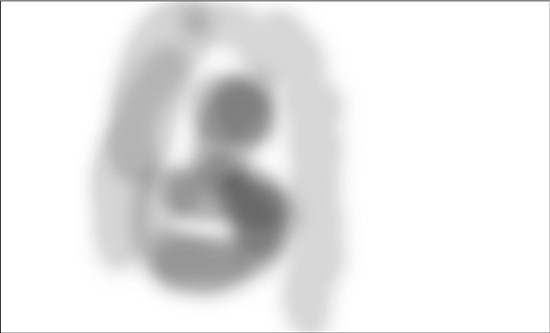
We’ve controlled the areas altered via a layer mask (Shown below). 
The next layer lightens the iris as these were also darkened when converted. To do this we’ve used a masked curves layer.
Finally the black & white conversion, which has been done via a Channel Mixer adjustment layer.
You will notice from this image that we’ve checked the monochrome box and we’ve increased the red channel by 100 (for more information on using the Channel Mixer please read this tutorial). Biasing the conversion to the red side makes sure the skin tones are light and blemishes are minimized.
Before fine tuning the image I find that its best to a take a break so you come back to the image with fresh eyes, helping you to see where to make changes if any are needed.
Break over, I decided that the next thing to do was to increase the contrast and lightness of the image which I achieved through a curves layer.
The adjustment was a bit harsh on the skin tones making them too bright so a layer mask was used to reduce the effect there. So far the image now looks like this (below), nearly there but there are still a few more changes to be made.
The skin tones are still a little too dark (particularly oh the right) so another curves layer is needed to target them.
. Again this has been masked to stop the hair and clothes being affected.
The image was still to dark in areas so I’ve added another masked curves layer to changes this.
One more curves layer was added to punch up the contrast.
The mask for this layer was quite subtle and helped to soften some areas of the face.
Lastly the background was a little grey and the extra area we added to the canvas quite obvious so I added a new later and, using the brush I painted white over these areas.
The final Image looks like this.
I hope you found this tutorial informative in describing the stages and process of changing an image to black & white. The exact stages are unique to this photograph but the methodology is the important bit and can be applied elsewhere.


Comentaris
Publica un comentari a l'entrada