Salta al contingut principal

Creative Color Processing (Part 2/3 – Split Toning)

This is Part 2 of a 3-part series on creative color effects using Lightroom 4. In Part 1 of the series, I discussed shifting White Balance either warmer or cooler for creative effect. In this article I will explain Split Toning, and also give you some ideas for using creative white balance and split toning together for even more color control.


For this image, I used split toning to complement the autumn foliage by adding red to the shadow areas:


Split toning used to add a warm reddish hue

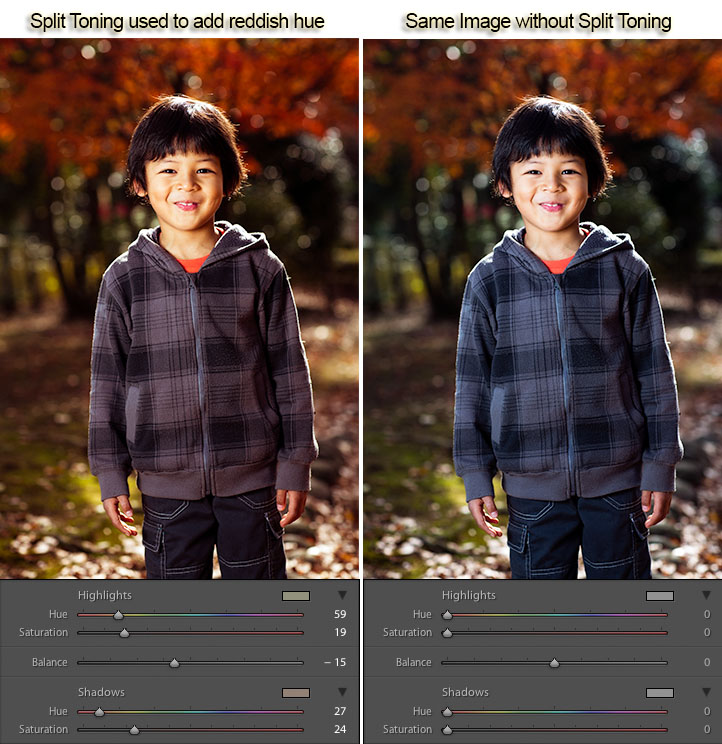
Example of Split Toning used to add a reddish hue


While white balance affects the entire image, split toning allows you to treat the shadows and highlights differently. You can add one color to the shadows and a different color to the highlights, and also control the balance between the two.


In processing this scene of a street in Tokyo I used split toning to add blue to the shadows and yellow to the highlights:


Example of Split Toning

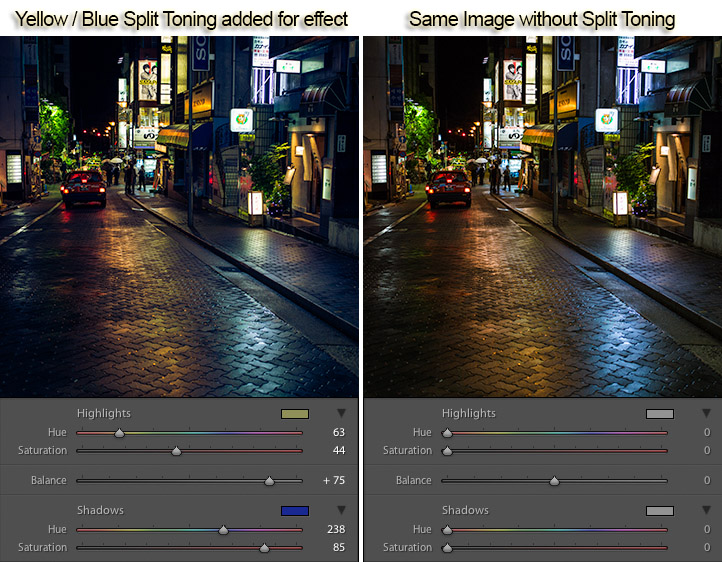
Example of Yellow / Blue Split Toning


Split Toning can also be combined with white balance for creative effect. In the photo below I used a cool 3500 kelvin white balance, and then used split toning to warm the skin tones by adding yellow to the highlights. The result is cool-toned image, without unnaturally bluish skin tones. In this way, white balance and split toning can be used together to create an effect that would not be possible with either tool on its own.


Split toning to warm skin tones

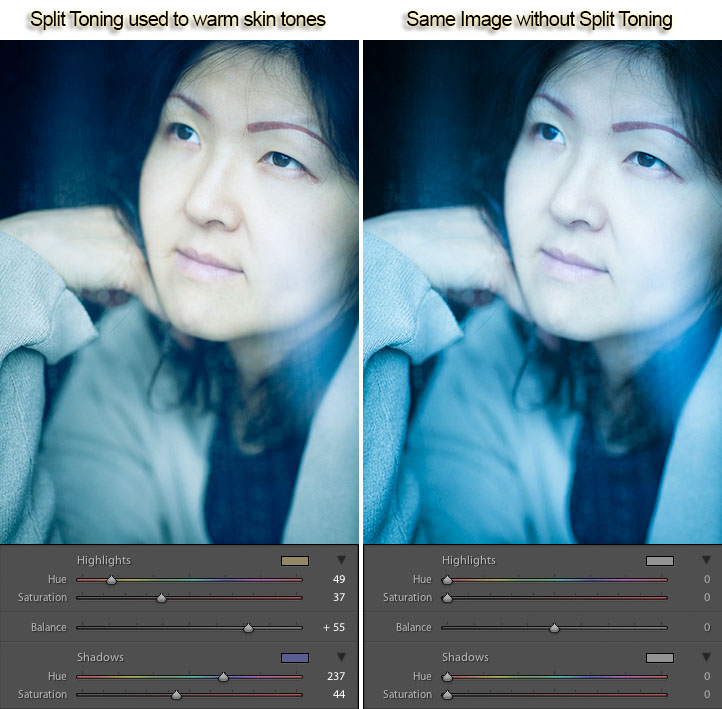
Using Split Toning to warm skin tones


Creative color processing is very subject, and ultimately comes down to personal preference. Even if you don’t really like the editing decisions I’ve made in these sample photos, I hope I’ve inspired you to try some new techniques for creatively processing your photos. I appreciate feedback, please comment below or feel free to connect with me through Facebook or Google+.


This concludes Part 2 of my Creative Color Processing series. In Part 3, I will show you how to use the Tone Curve tool to control the red, green, and blue color channels separately.


Post originally from: Digital Photography Tips.


Check out our more Photography Tips at Photography Tips for Beginners, Portrait Photography Tips and Wedding Photography Tips.


Creative Color Processing (Part 2/3 – Split Toning)


via Digital Photography School http://digital-photography-school.com/creative-color-processing-part-23-split-toning?utm_source=feedburner&utm_medium=feed&utm_campaign=Feed%3A+DigitalPhotographySchool+%28Digital+Photography+School%29

Comentaris

  1. Your information is very valuable which is useful for me. I wish you all the best. Thank you so much.

    transparent background Photoshop

    ResponElimina

Publica un comentari a l'entrada

Entrades populars d'aquest blog

15 Tutoriales CSS3 para mejorar tus paginas web

15 Tutoriales CSS3 para mejorar tus paginas web : Les dejo una pequeña recopilación de tutoriales CSS3 que espero sean de utilidad para ustedes, intentamos hacer una recopilación bastante completa para crear impresionantes diseños web con CSS3 y aprovechar las bondades de CSS3 incluso para aplicar efectos, son un total de 15 tutoriales CSS3 gratis . Crear menu dropdown con CSS3 Crear breadcrumbs con estilo Transiciones de paginas con CSS3 Crear timeline con CSS3 y jQuery Reproductor de video con HTML5, CSS3 y jQuery Crear efecto acordion CSS3 Aplicar degradado a texto Crear texto en curva con CSS3 y jQuery Aplicar textura a texto con Magic Pill Crear slider de imagenes con CSS3 y jQuery Rotar texto con CSS3 Crear menu vertical con CSS3 Crear formulario con HTML5 y CSS3 Crear efecto de imagenes apiladas con CSS3 Aplicar estilos para imagenes con CSS3  

El meu editor de codi preferit el 2024, que això ja se sap que va canviant 😄

Visual Code Visual Code és un editor de codi font lleuger, però potent que s’executa al teu escriptori i està disponible per a Windows, macOS i Linux. Compta amb suport integrat per a JavaScript, TypeScript i Node.js i té un ric ecosistema d’extensions per a altres llenguatges i entorns d’execució (com C++, C#, Java, Python, PHP, Go, .NET).  És una eina ideal per a desenvolupar i depurar aplicacions web i en el núvol. Per què Visual Code? Visual Code té molts avantatges com a editor de codi font, com per exemple: És gratuït, ràpid i fàcil d’instal·lar i actualitzar. Té un ampli ecosistema d’extensions que et permeten afegir funcionalitats i personalitzar la teva experiència de desenvolupament. Té un suport integrat per a molts llenguatges i entorns d’execució, i et permet depurar i executar el teu codi des del mateix editor. Té una interfície senzilla i elegant, amb diferents temes i modes de visualització. Té un sistema de sincronització de configuracions que et permet guardar les...

Learn Composition from the Photography of Henri Cartier-Bresson

“Do you see it?” This question is a photographic mantra. Myron Barnstone , my mentor, repeats this question every day with the hopes that we do “see it.” This obvious question reminds me that even though I have seen Cartier-Bresson’s prints and read his books, there are major parts of his work which remain hidden from public view. Beneath the surface of perfectly timed snap shots is a design sensibility that is rarely challenged by contemporary photographers. Henri Cartier-Bresson. © Martine Franck Words To Know 1:1.5 Ratio: The 35mm negative measures 36mm x 24mm. Mathematically it can be reduced to a 3:2 ratio. Reduced even further it will be referred to as the 1:1.5 Ratio or the 1.5 Rectangle. Eyes: The frame of an image is created by two vertical lines and two horizontal lines. The intersection of these lines is called an eye. The four corners of a negative can be called the “eyes.” This is extremely important because the diagonals connecting these lines will form the breakdown ...