Usually my post-processing is restricted to the brackets that I have of a particular scene. I try to bring out, as much as possible, the best in that scene. Sometimes, however, I feel that an image can benefit from some creative blending of separate images.
Want more free Photoshop & HDR tutorials? Feel free to connect with me on facebook to receive updates of new tutorials and HDR images. ![]()
The before and after below is a great example of this. The desert town, Sand Pedro de Atacama, has a Spaghetti Western feel to it. In this image I was happy with the foreground but felt the sky was lacking.
I took the Milky Way from an image I’d shot the day before and blended them. In this short tutorial I’ll show you how to do the same very quickly and I will also give a full-size image of the Milky Way to work with. Please don’t try to sell the image. I’m giving it to you to use on images that you can sell or use commercially but the entire image is not for commercial use.
Also, if you wish to experiment with this, I would really appreciate it if you included my name and blog address when you publish it. If you post your published image in the comments box of this post I’d be happy to check it out.
Before and After

How to add stars to an image in Photoshop
–The diagram– Click to enlarge
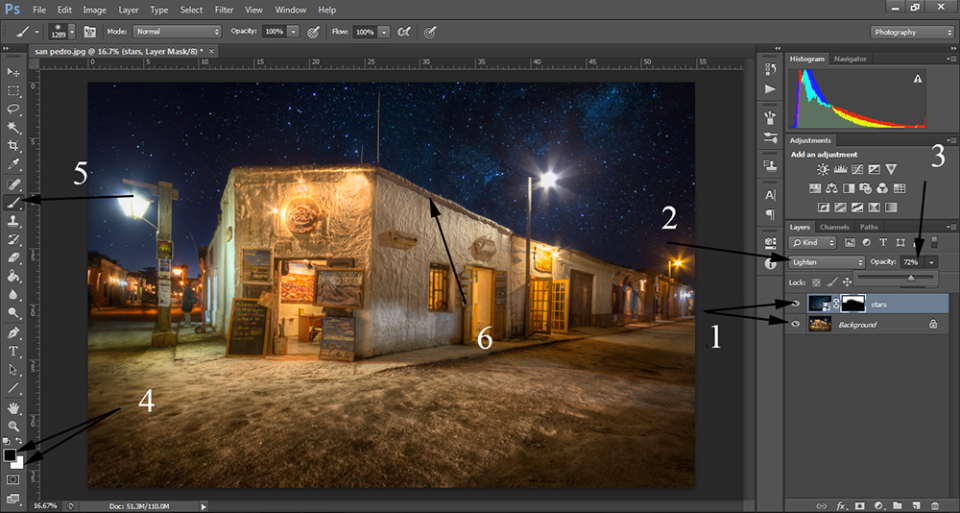
–What the numbers mean—
1. Place your main image as the bottom or background layer. Drag the Milky Way on top of that layer.
2. Change the Blend Mode to Lighten. This will remove everything from the top layer that is darker the corresponding area on the layer below. In other words, mainly just the stars or star clusters will be visible from the top layer now.
3. Change the Opacity according to how bright you’d like the stars to be.
4. Make sure the colors selected are Black and White, as you see in the picture. Then create a layer Mask by clicking on the square at the bottom of the Layers panel (make sure the Stars layer is selected beforehand)
5. Finally, select the brush tool and start painting out the stars that are over the buildings and the rest of the foreground, leaving just the stars in the sky.
6. This is just to show that you need to paint carefully around the edges, so as not to create a dark, star-less halo around the foreground.
And that’s it!
You may be asking, why do we need to change the Blend Mode? Why can’t we just mask out the foreground of the Stars image? Well, give it a try and see how difficult it is. This way, you keep all of the luminosity of the original sky and do not effect the foreground at all. It doesn’t get much easier.
One other tip, the main photo was shot towards the end of blue hour when the sky is incredibly dark. Adding stars to this sky was fine. However, stars added to skies during a rich blue hour would look out of place. The darker the sky the better.
You can download the full sized Milky Way shot here:
Download Milky Way – this image hosted on a separate site. It is free to download the photo and doesn’t not require an account. Simply click Download to get the image.
Do you want to take your HDR imagery to the next level? Follow me through Photomatix, Photoshop and advanced digital blending in my video tutorials.
Beginner’s HDR tutorial
Digital Blending HDR Tutorial
I hope you’ve found this tutorial useful. If you have, and you think others might find it beneficial, feel free to share it and help to build the resources on this site.
And feel free to join me on facebook or Google+
via Travel Photos - Through Strange Lenses http://www.throughstrangelenses.com/2013/06/11/tutorial-adding-stars-milky-way-to-an-image-in-photoshop/
Comentaris
Publica un comentari a l'entrada