Have I mentioned how much I love photography and technology. Here’s a good case for mixing them together.
As you say previous on the Q&A with Uncornered Market, creating panorama’s can create some amazing images. I took their methodologies and applied them to some of my own panoramas, which do not cover 360 degrees all around. This method is more practical for those of us without fisheye lenses. Take a look at this tutorial if you are curious for a step by step on creating your own immersion panoramas.
You will need to click over to my blog to view the immersion panorama described in this demo because DPS does not yet support embedding the SWF file type. The image can be found at this post and a static version is shown here:
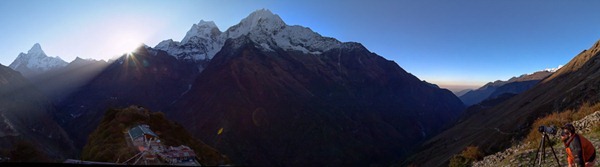
Title: Nepal Himalaya Panorama Exploration
Location: Mong, Nepal
To answer the question, “How did you make that?” I offer this post as instruction. It’s not magic and it’s something you can accomplish. I had the aid of a number of computer programs:
Additionally, the hardware I used included:
- Canon 7D camera
- Canon 28-300mm L lens
- Bogen 3021 tripod with ball head
Those are the basics. The other important piece of equipment was an alarm clock. I knew I needed to be up at least an hour before the sunrise in order to get dressed (it was a bit cold), grab a snack and find my location. I had scouted a likely spot the night before and I had taken nearly this same photo in 2008 while trekking. Scouting your location really helps when timing, as with a sunrise, is critical.
Get Ready
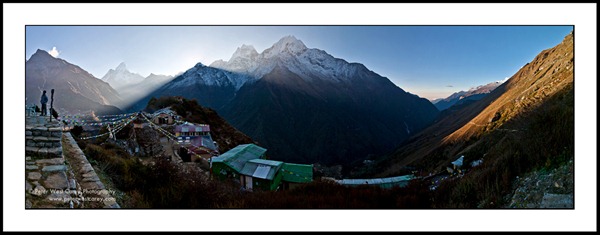
After getting myself out of bed and trudging up a small hill to the location, scaring a dzokyo with horns (it’s a cross between a cow and a yak) over a fence in the process, and after avoid his ‘cow pies’ (I’m not romanticizing this process enough, am I?), I set up my camera. Important in this step was to find a location with good visibility that would allow me to see over the roofs, but still capture the stupa in the middle of the village. Also important was good stability of the ground so I or my tripod would not slip.
 My plan was to shoot the scene as a single swatch of panorama. I didn’t have the immersion viewer in mind when creating this, just a traditional super wide image for print. So I set up my tripod and made sure the base was level. I did this using the back of camera screen level that comes with the Canon 7D. If not, I would need a little level, like this one. This is an important step! If the camera is tilted, the longer your panorama, the less overall useable space you will have when it is leveled and cropped. Practice this at home so you don’t waste time in the field learning to get things level (and then become disappointed when back at home crying at your computer screen. Yes, I’ve done that).
Now with the base of the tripod level, I placed my camera onto it in a vertical orientation. I wanted a tall image and this would allow me to capture more scene. I also knew the timing would only allow for one pass. Once the sun was up, the lighting would change and I’d spend many aggravating hours on the computer trying to balance it all out if I didn’t get it in one pass.
Those steps in bullet form:
- Scout a location before
- Scare off large animals
- Set tripod on stable ground
- Level tripod
- Attach camera
Get Set
Camera on the tripod and the sky is getting brighter. I have a better idea where it will peek over the peaks. I start taking some meter readings and figuring out where I want to set my aperture and shutter speed. I already know I will set my ISO to 100 for the least amount of noise I can hope for. I then picked my focus point and locked it (turned off auto focus). Oh yeah, I also set my aperture at this point based on how much depth of field I wanted, doing this in conjunction with picking a focus point not completely to the horizon. I picked a point about 30 feet from me to focus on. This allowed me, at f/10, to have most of the scene in focus, which was going to include the fence, stupa and distant mountains. Plus my guest on this tour off to my side (who would later be begged, “Please don’t move!” when I shot frames with him in them). My closest object, besides some ground, was about 15’ away.
I did this in Manual mode so the exposure settings would not change. My settings ended up being 1/100th of a second and f/10. Going into the menus for my camera, I turned on the exposure bracketing and chose one step over exposed and one step under exposed. I locked my tripod’s ball head once all was level as I would be using the base swivel where the tripod met the head’s body to turn my panorama. I swung through the action a few times, making sure it was level in all spots. There are newer heads on the market, such as the Induro PHQ, which have levels built-in to help make this step easier.
Lastly in this step, I set my white balance (not required, but it makes post processing easier) and turned off my lens’ image stabilization because I was using a tripod. A couple more swings through to make sure I knew what I’d be doing. One more step was to turn my frame rate to high. This would allow the bracketing to shoot quickly and speed up the whole shoot. In these practice swings I timed myself to make sure I would have time to stop at each point, get my shots, and move while not causing blur from too fast a motion. I also wanted to complete my shot in less than a minute to make sure the lighting didn’t change too dramatically during the shoot.
Those steps in bullet form:
- Meter
- Switch to Manual mode
- Set Shutter Speed
- Set Aperture based on desired depth of field
- Turn off Image Stabilization
- Set focus and lock
- Check level throughout path of shoot
- Turn on high speed shooting mode
- Make sure camera is set to RAW (if desired. A note here: if you find your camera’s buffer can’t keep up with your rate of shooting, you may need to choose a smaller size RAW format if you can, or switch to JPEG)
- Breathe
GO!
I ratcheted my camera back to my start point on the far left side. I was on a hill and would not be making a full 360 degree sweep as the hill itself wasn’t exciting (and far too close). When the sun just started to top the left side of the peak, I started shooting, overlapping by about 30%, give or take. A robot like the Gigapan EPIC would have helped. Each stop produced three images as such:

Under exposed by a stop, at exposure and over exposed by a stop
Sweeping through my shot in just about one minute perfectly I checked the images on the back of my camera and breathed easy. The buffer had started to get full and I had to slow my shooting a half way through, but it wasn’t bad enough to effect the final image.
With the 117 shots secured (and later that night they were backed up to a second and third drive), I continued my tour while still contemplating how to merge them without spending hours on the computer when I returned home.
Those steps in bullet form:
- Wait for your moment to start
- Know your timing for the whole panorama if timing is critical
- Shoot!
- Breathe, again
Putting It All Together At Home
At first I attempted to use hugin to stack my images (each set of three shots makes a stack) and then create a panorama. The results were ok, but there was a LOT of manual work in aligning the images. I then was given a copy of AutoPano Giga to try out and it has created, for me, a boon in panorama processing. I will give a full review in the coming weeks, but for now I just want to show how I created this particular image and not get into all the nuts and bolts of the program.
My first step was to import the images into Adobe Lightroom and adjust the exposure settings. I did this for the middle shot, the one you see above. It has the widest range of light and I wanted to make sure I kept it looking realistic. I only adjusted the middle image, the one with the camera’s suggested exposure settings. After I did this and removed any spots, I also adjusted the image for clarity, saturation and the like, but not too much as I would perform more near the end of the process. This is a personal preference and your settings will vary.
 With the one image edited to my liking, I then synced those settings with the rest of the images using Lightroom’s sync feature. Nice and easy. I then exported each image as a full sized JPEG. In later work, I will be using the DNG file type as AutoPano Giga can handle those and there will be less compression. All of those files went into one folder and it’s time to use AutoPano Giga.
This software is quite easy for basic shoots. After starting the program I imported all the photos by selecting “Select Images”. Once loaded the screen looks like this (click for larger version):

An important feature in this software is the simplicity with which I can create stacks. All it takes is a right click and then selection of the “Create stacks by N…”. This allows me to input that there are three (or any number) of images per stack. Now I don’t have to line them up or tell the program I was using bracketing for my shots. With the stacks created, I pressed the “Detect” button up top and AutpPano Giga does its best to align my images. Here’s the result, which appears on the right side of the screen.

Luckily there was not a lot of waste in this image because of taking the time to level the camera properly. AutoPano Giga aligns, color corrects, adjusts exposure and a few other items when performing this step. I will have more on the software in a full review later.
I output this as a PSD file to help preserve the image quality. This takes a while and makes a huge file (2GB). Patience is needed. I could also output to a JPEG to save time, but as I want to present my best work and make it highly zoomable, I chose the PSD format.
Opening the resulting file in Lightroom (in this case, Lightroom 4 Beta), I then crop the image and play with exposure to get it how I want it.

After adjusting the image, I exported the file as a .PSD file type, again to preserve as much detail as I can (and again, I will be using DNG files for the first compression in the future, but that also adds considerable time when processing multiple panoramas. At the very least, you will see the quality possible when using one of the faster methods given here). Opening the file in PanoTour Pro, I have a number of options to set.

On the right hand side are most of the important bits for this project (a review of PanoTour Pro will be forthcoming as well, after I have played with it more). The size is already set with the width of the image imported. I set the JPEG quality to 12 instead of 10. In the next tab, I set the projection to only be 300 degrees so it does not wrap around.


Lastly, I ticked the check box next to “Embed all data”. This enables the output to be a singular file, which can make for easier handling (and a higher file size).

All that was left was to upload the resulting .SWF file after I performed an export (the program has a facility to upload the resulting SWF file or files, but I wanted to check the results locally before spending the time to upload).
I encounter one small glitch while creating this file; my web service isn’t the fastest on the planet. The SWF file that resulted was about 125MB large. Normally not a problem but it slowed down the experience for many readers. So I went back in and cut the image size to 14,000 pixels wide in PanoTour Pro and decreased the compression to 10. This resulted in a file about 5.5MB large and much quicker to download. On that original post, I linked to the original file for those with patience, as the full detail is really incredible.
Those steps in bullet form:
- Import into Lightroom (or your editor of choice) and adjust as needed (but not too much)
- Export to DNG files, ideally
- Import into AutoPano Giga
- Create Panorama and export as PSD (Tiff would be another fine option, or JPEG if your space and resources are limited)
- Open in Photoshop or Lightroom or GIMP or … and crop. Make final adjustments. Export as PSD or simply save file
- Import into PanoTour Pro and set variables as needed
- Export as SWF file and upload to server (using the programs built-in FTP capabilities if desired)
On The Website
To make all this magic work on my blog, I had to install a plugin. The one I chose is called PanoPress and you can download it from their website. It’s an easy install and so far has not wreaked havoc on my site. Natively, WordPress, which is what powers my site, does not support SWF files in the sense of viewing panoramas like this. The best part of all this magic is the ability to choose fullscreen mode. Letting viewers fill their entire screen is something we photographers don’t often do and it can be intoxicating. PanoPress makes this magic work.
Conclusion
2000 words later…that’s it! I know it might seem like a lot, but with the choice of software this time around, I am very happy with the flow. I can also process multiple images in series (often setting my computer to pound through the large files while I sleep) and receive predictable results. I have more learning to do with the Kolor products to refine things and see if I can automate more of the mundane settings.
Also of note, I went through this process in both Lightroom 3 and Lightroom 4 Beta. I was far happier with the results in Lightroom 4 and they are what you see on the site.
I look forward to crafting more of these types of images (and have already started to, here) as I go back through old panoramas that I have taken and make them more presentable on the web. This process will not work for everyone out there (it can, though, be performed on a Mac or PC as listed and on a Linux machine without the Lightroom aspect) but it is my sincere hope that it helps more of you present your art in a dramatic way on the web.
If you have any questions, please let me know.
Post originally from: Digital Photography Tips.
Check out our more Photography Tips at Photography Tips for Beginners, Portrait Photography Tips and Wedding Photography Tips.
How I Shot And Edited It – Nepal Zoomable Panorama [READY]
Comentaris
Publica un comentari a l'entrada