Using Manual Mode: Exposure Lesson #4:
This is the third in a series of four articles about exposure by Andrew S Gibson – author of Understanding Exposure: Perfect Exposure on your EOS camera. You can read the first lesson, which explored the reasons for using program, aperture priority and shutter priority modes, here, the second lesson, which explained why your camera’s meter gets exposure wrong, here, and the third lesson, which looked at your camera’s metering modes, here.
In my last article I explained that evaluative metering (also known as matrix or multi-segment metering) is the most advanced built-in metering system that camera manufacturers have yet to come up with.
However, despite its sophistication, evaluative metering mode can still get the exposure incorrect.
With the camera in any automatic exposure mode (such as program AE, aperture priority or shutter priority) and the metering mode set to evaluative metering you may see the exposure reading change in the viewfinder as you frame and reframe the subject, exploring different compositions. This is despite the ambient light levels staying the same.
In theory, if the ambient light levels are steady, the camera should return the same exposure reading no matter how you frame the subject, right? No – because the camera is measuring light reflected from the subject. If the balance of light and dark tones within the frame changes, so will the exposure reading given by the camera.
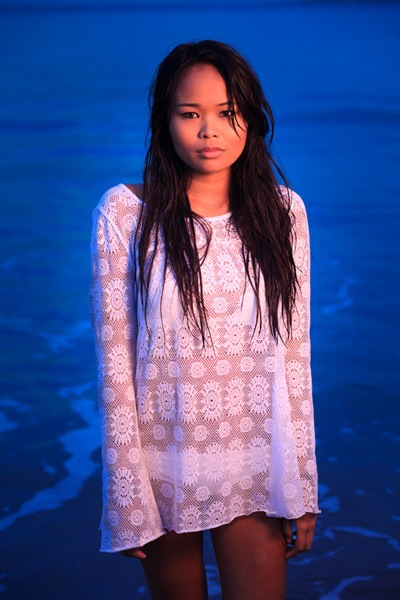
The above photo shows a situation where this can happen. The model is dressed in white and posing against a dark background. With a scene like this the camera’s suggested exposure settings change as you frame the model in different ways.
Switching to manual mode prevents that from happening. The advantage of manual mode is that once you have determined the optimum exposure settings, you can set the ISO, aperture and shutter speed and keep them the same until the light changes (or you want to alter them for creative reasons).
Manual mode works best when the light levels are steady. If the light is constantly changing, for example if the sun is going in and out behind clouds, then you should use one of the automatic exposure modes.
There are the types of subject for which I prefer to use manual mode:
In order to simplify the process I prefer to set the camera to manual mode. This means that I don’t have to worry about exposure as I’m taking the photos.
I start by setting the camera to aperture priority and taking a test photo. I then look at the histogram to see how accurate the exposure was, adjust and take another test photo if necessary (if you’re unsure how to use the histogram to check exposure then read this article).
Once I’m happy with the settings, I switch to manual mode and lock in my chosen ISO, aperture and shutter speed. I only need to adjust exposure if the light levels change.
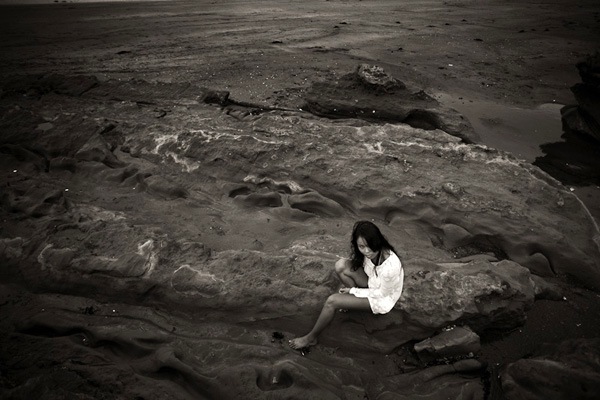
Manual mode is also useful if I’m using off-camera flash to light the model. I set the exposure for the background (I like to underexpose it for dramatic effect) then adjust the power on my Speedlite to give the correct exposure at my chosen aperture. I use my Speedlite in manual so that it outputs the same amount of light each time I take a photo.
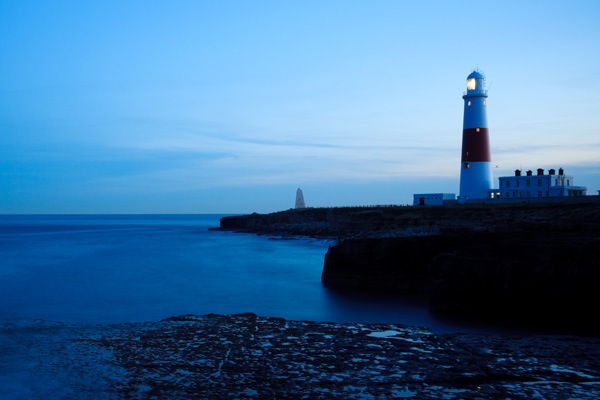
I also use manual mode when I’m taking landscape photos. Dusk is my favourite time for shooting landscapes and I often take a series of photos as the light fades.
I keep an eye on the histogram – it creeps to the left as it gets darker and I normally increase the shutter speed to compensate (or sometimes I open the aperture or raise the ISO, depending on the situation).
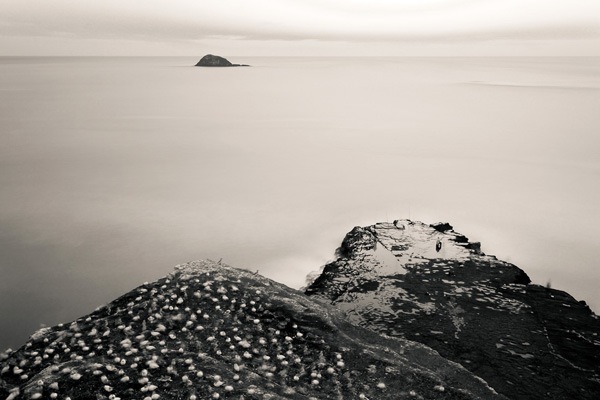
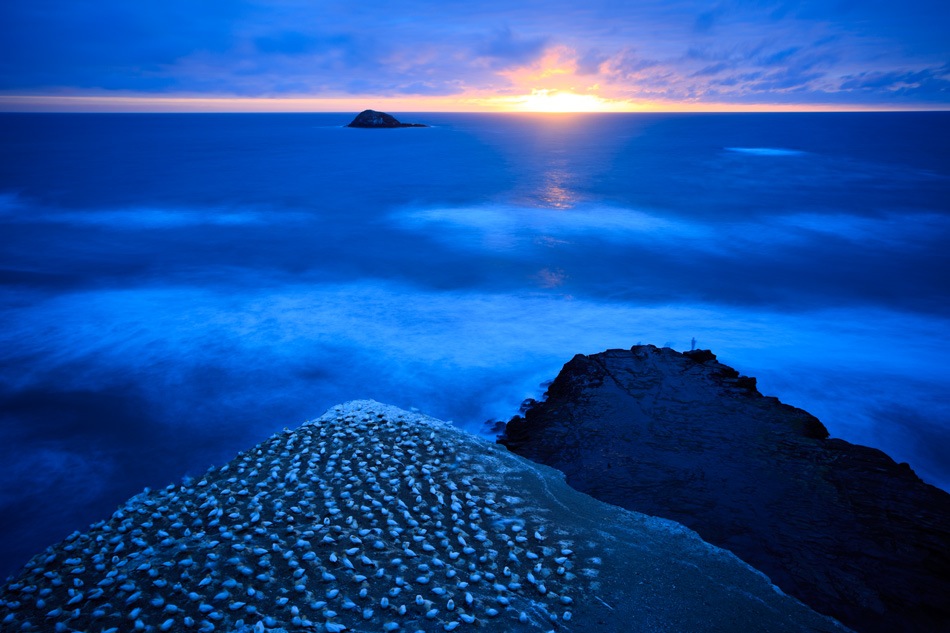
This photo was taken with an exposure of five minutes. Compare it to the previous photo, taken with a shutter speed of 30 seconds, to see the difference the long exposure makes to the texture of the sea.
The purpose of this exercise is to slow down the shooting process and get you thinking about the relationship between these elements of the exposure triangle.
In manual mode, there will be an indication in your viewfinder as to whether the exposure settings you have selected are correct according to the camera’s built-in meter. Check your instruction manual to see how it works on your camera.

The above diagrams show how it works on Canon EOS cameras. The arrow shows that the top display is correctly exposed, the middle display is overexposed by a stop, and that the bottom display is underexposed by a stop.
If you’ve read the previous articles in this series you will understand that the camera’s meter may not get the exposure right. For example, if you are taking a photo of a white flower, then you will want to overexpose the photo by around two stops to obtain the optimum exposure. Once you have decided on the settings to use, take a photo and look at the histogram to see how accurate the exposure was. You can then adjust if necessary and shoot again.
Andrew S Gibson is a writer and photographer. He’s the Technical Editor of EOS magazine and writes for Craft & Vision. The techniques in this article are explored in more detail in his ebook Understanding Exposure: Perfect Exposure on your EOS camera.
Post originally from: Digital Photography Tips.
Check out our more Photography Tips at Photography Tips for Beginners, Portrait Photography Tips and Wedding Photography Tips.
Using Manual Mode: Exposure Lesson #4


This is the third in a series of four articles about exposure by Andrew S Gibson – author of Understanding Exposure: Perfect Exposure on your EOS camera. You can read the first lesson, which explored the reasons for using program, aperture priority and shutter priority modes, here, the second lesson, which explained why your camera’s meter gets exposure wrong, here, and the third lesson, which looked at your camera’s metering modes, here.
In my last article I explained that evaluative metering (also known as matrix or multi-segment metering) is the most advanced built-in metering system that camera manufacturers have yet to come up with.
However, despite its sophistication, evaluative metering mode can still get the exposure incorrect.
With the camera in any automatic exposure mode (such as program AE, aperture priority or shutter priority) and the metering mode set to evaluative metering you may see the exposure reading change in the viewfinder as you frame and reframe the subject, exploring different compositions. This is despite the ambient light levels staying the same.
In theory, if the ambient light levels are steady, the camera should return the same exposure reading no matter how you frame the subject, right? No – because the camera is measuring light reflected from the subject. If the balance of light and dark tones within the frame changes, so will the exposure reading given by the camera.
The above photo shows a situation where this can happen. The model is dressed in white and posing against a dark background. With a scene like this the camera’s suggested exposure settings change as you frame the model in different ways.
Switching to manual mode prevents that from happening. The advantage of manual mode is that once you have determined the optimum exposure settings, you can set the ISO, aperture and shutter speed and keep them the same until the light changes (or you want to alter them for creative reasons).
Manual mode works best when the light levels are steady. If the light is constantly changing, for example if the sun is going in and out behind clouds, then you should use one of the automatic exposure modes.
There are the types of subject for which I prefer to use manual mode:
Portraits
When I take someone’s portrait I want to concentrate on composition and expression. It’s essential to communicate with the model and direct her to achieve this.In order to simplify the process I prefer to set the camera to manual mode. This means that I don’t have to worry about exposure as I’m taking the photos.
I start by setting the camera to aperture priority and taking a test photo. I then look at the histogram to see how accurate the exposure was, adjust and take another test photo if necessary (if you’re unsure how to use the histogram to check exposure then read this article).
Once I’m happy with the settings, I switch to manual mode and lock in my chosen ISO, aperture and shutter speed. I only need to adjust exposure if the light levels change.
Portable flash
Manual mode is also useful if I’m using off-camera flash to light the model. I set the exposure for the background (I like to underexpose it for dramatic effect) then adjust the power on my Speedlite to give the correct exposure at my chosen aperture. I use my Speedlite in manual so that it outputs the same amount of light each time I take a photo.
Landscape photography
I also use manual mode when I’m taking landscape photos. Dusk is my favourite time for shooting landscapes and I often take a series of photos as the light fades.
I keep an eye on the histogram – it creeps to the left as it gets darker and I normally increase the shutter speed to compensate (or sometimes I open the aperture or raise the ISO, depending on the situation).
Long exposure photography
When the required exposure is longer than 30 seconds (the longest available shutter speed on most digital cameras) you need to switch to bulb mode. In bulb mode, the shutter stays open as long as you want it to (use a cable release or remote release to open and close the shutter without touching the camera). This is another form of manual mode.This photo was taken with an exposure of five minutes. Compare it to the previous photo, taken with a shutter speed of 30 seconds, to see the difference the long exposure makes to the texture of the sea.
Creative Exercise:
Using manual mode is an excellent way to learn about the relationship between ISO, aperture and shutter speed.The purpose of this exercise is to slow down the shooting process and get you thinking about the relationship between these elements of the exposure triangle.
In manual mode, there will be an indication in your viewfinder as to whether the exposure settings you have selected are correct according to the camera’s built-in meter. Check your instruction manual to see how it works on your camera.
The above diagrams show how it works on Canon EOS cameras. The arrow shows that the top display is correctly exposed, the middle display is overexposed by a stop, and that the bottom display is underexposed by a stop.
If you’ve read the previous articles in this series you will understand that the camera’s meter may not get the exposure right. For example, if you are taking a photo of a white flower, then you will want to overexpose the photo by around two stops to obtain the optimum exposure. Once you have decided on the settings to use, take a photo and look at the histogram to see how accurate the exposure was. You can then adjust if necessary and shoot again.
Andrew S Gibson is a writer and photographer. He’s the Technical Editor of EOS magazine and writes for Craft & Vision. The techniques in this article are explored in more detail in his ebook Understanding Exposure: Perfect Exposure on your EOS camera.
Post originally from: Digital Photography Tips.
Check out our more Photography Tips at Photography Tips for Beginners, Portrait Photography Tips and Wedding Photography Tips.
Using Manual Mode: Exposure Lesson #4
I really like your blue photography. Also, Your others photography is nice and your sharing information is important. Thank you so much for your valuable sharing. Good wish for you and your family.
ResponEliminahow to remove clothing wrinkles in photoshop