
How to create a game using jQuery
Today we are making a simple puzzle game called “Fifteen”. The purpose of the game is to slide 15 square blocks around to form an image. The goal of this tutorial is to look at this simple browser-based game and explain how it was made line by line. It’s a great way to learn jQuery. For this tutorial, We will use a 2D image square-sliding game I created last week and I will go over each line of code to demonstrate the train of thought. I really do believe that breaking this game up into explanations on per-line basis will help you understand how to use jQuery in your own projects.
Live Demo
download in package
Creating a Game as a jQuery Plugin
A jQuery plugin is a perfect way to create image slideshows, custom user interface controls and of course browser-based games. We won’t just write JavaScript code here, we will create a jQuery plugin.
A plugin is nothing more than our own custom jQuery method. You know how we have jQuery’s methods .css() and .animate()? Well, jQuery gives us the ability to extend its own functionality with custom methods that we create ourselves. Like the existing jQuery methods, we can apply the method we will create to a jQuery selector.[1]
Well, the game is called Fifteen, and we want to make our game “embeddable” inside an arbitrary HTML element like <div id="game_object">here</div> so we can move it around anywhere on the page (Different sites have different layouts, wouldn’t you like to have the ability to embed your jQuery game/plugin into an arbitrary DIV element on any site?)
Let’s get started with the jQuery code.
We will actually create our own jQuery method and call it .fifteen(). Therefore, in order to launch the game inside an HTML element with id “#game_object” we will call this command:
$("#game_object").fifteen(175);
This will create and attach the game board to the div whose id is “game_object.” Also, each square will become 175 by 175 pixels in width and height based on the only passed parameter.
In this tutorial I used the image of a kitty. You can replace it with any image you want.
Executing a custom method as shown in the code above will pass the selector string “#game_object” to our plugin function which grabs the DIV. Inside our custom method, we can refer to that selector/element using the this keyword. And we can also enable jQuery methods on it by passing it to the new jQuery object like so: $(this); — inside the extended function we will create.
In order to create our own jQuery plugin we will use the $.fn.extend method.
We can also refer to this as extending functionality of the jQuery library with our own methods. Let’s take a look:
 $.fn.extend({
    fifteen: function (square_size) {
        // Game code goes here...

        // Example -- set the width of all DIVs to what was passed as square_size
        $("div").css({width: square_size});

        // The basics of the inner-workings of a plugin:
        var a = this;                // refers to the passed selector,
                                     // eg: $("#game_object")
        var b = $(this);             // same thing, but with jQuery methods enabled

        // Let's do something with the HTML element passed as the CSS selector
        this.style.color = "red";    // paint all text inside "#game_object" red
        $(this).css("color", "red"); // same exact thing, using jQuery method .css()
    }
});
That’s it! This is the basic structure of any jQuery plugin.
The code examples I use above are just examples that show how the basics work internally. But we will write an entire game within the scope of the function we called “fifteen”.
Within the scope of the plugin the this object refers to what was passed in the selector. Also, the square_size parameter is just a custom, arbitrary parameter passed to our game.
We decide what the parameters should be, and if your game or plugin require more, simply define more parameters, as in:
$.fn.extend( { fifteen: function(square_size, param2, param3, etc) { /*.. game code…*/ } } );
Within the scope of your plugin you refer to parameters by the very same names.
In my case square_size is the only parameter. It defines the arbitrary size of the square in the game. I use 175 (as in 175 pixels in width and height). The grid is 16 by 16, but there are only 15 movable squares, because one is always empty. However, we still create all 16 DIVs, and just make one white. We do this in order to simulate the shadow effect on an empty square.
Before we get into the code, let’s take a look at the game’s construction as far as HTML goes. You will notice that there are 16 squares and each square is a separate DIV element:
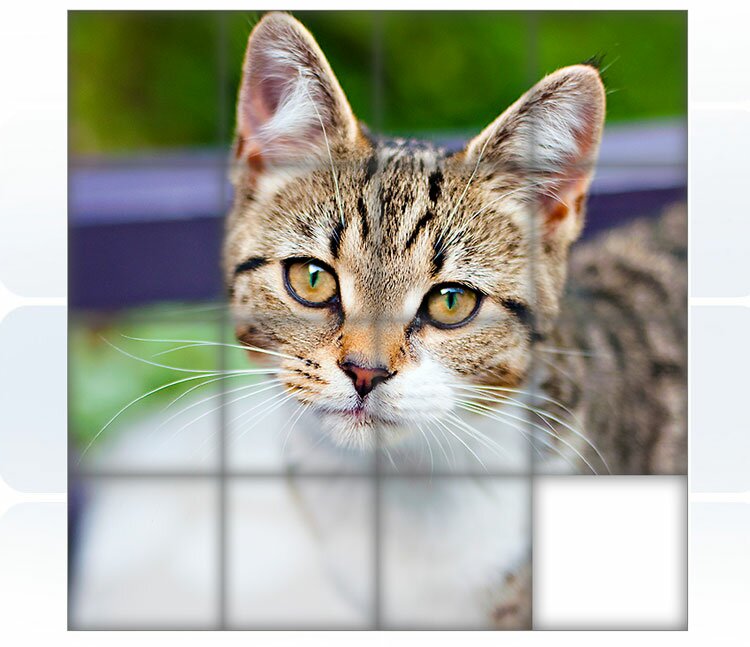
The point of the game is to shuffle the image, one square at a time (by shifting it into the empty square, thus swapping locations) until the image is complete.
The white square is always empty. You are only allowed to shift squares that can physically be shifted into the empty spot, as if on a physical game board. This means only squares to the north, south, west and east of the empty square can be shifted. This test is performed within the stand-alone function I wrote and called Move() – it is separate from the plugin itself, it’s like a helper function.
Before I show you the code, I want to briefly talk about some common problems we will face while designing a plugin-based game.
1. Embedding the Plugin Into Arbitrary DIVs (or other HTML elements)
Remember that when writing your plug-in it is wise to inject the HTML elements which are created as part of the game… into a parent DIV. The purpose of this is that your plug-in becomes embeddable into any arbitrary HTML element. Different websites have different layouts. So it’s important for our plug-in to be flexible. That it could be embedded into an arbitrary HTML element anywhere on the page. In this example I called that element:
<div id="game_object"></div>
Moving around this element will physically move the game around anywhere on the page.
2. Injecting HTML into Empty Elements Using the .append(html) Method
We leave <div id="game_object"></div> unpopulated with any game HTML. Why’s that? This is because the plugin itself will generate game’s HTML elements and insert them into the target DIV. No need to pre-type them “by hand.”
This is smart, because it keeps the parent element clean. But also, this example in particular allows us to explore the jQuery’s native .append(html) method. It literally appends new HTML at the end of a specified element. That is, you never even have to write HTML into the document itself, the .append() method injects HTML into the web page dynamically, you just specify the target element using a selector like:
$('#board').append("<div></div>"); // Add one div to the end of #board
3. Using :nth-child(index) Instead of IDs or Classes
I think it’s worth mentioning that we can refer to DIVs inside, say, a parent DIV as children. This is really helpful. For example, let’s say we have 16 DIVs (children) stored inside one parent DIV:
<div id="board"> <!-- This is called a "parent" element //-->
    <div></div>
    <div></div>
    <div></div>
        <!-- ... ok, imagine 16 DIVs here. These are the "children" of "#board" //-->
    <div></div>
    <div></div>
</div>
You don’t really need to assign 16 IDs to all 16 DIVs! jQuery takes care of that for us. For example, to refer to the 3rd DIV inside a parent DIV (in our game it’s #board,) instead, we can do something like this without ever assigning any classes or ids to any of the children:
// Hide 3rd DIV in the list of children. No need to assign an id to each one!
$('#board').children('div:nth-child(3)').hide();
Notice we used the .children() method to grab all children of a parent (DIVs inside parent,) and then we also specified that we need a 3rd child using the literal selector :nth-child(n) where n is the index of the DIV we need. Note, however that this index doesn’t start with 0 like JavaScript arrays. It starts with index of 1. :nth-child(0) will not select anything.
Well, I think we are ready to start writing the code. Let’s get to it.
Step 1. HTML
First, let’s prepare HTML markup for our game:
    <!-- add styles -->
    <link href="css/main.css" rel="stylesheet" type="text/css" />

    <!-- add scripts -->
    <script src="http://code.jquery.com/jquery-1.7.1.min.js"></script>
    <script src="js/main.js"></script>

    <!-- This is where the game will be injected -->
    <div id="game_object"></div>
Step 2. CSS
There are a few styles for our game:
css/main.css
#game_object {
    background-color: #ffffff;
    height: 705px;
    margin: 20px auto;
    position: relative;
    width: 705px;
}
#board div {
    background: url("../images/cat_face.jpg") no-repeat scroll 0 0 #ffffff;
    cursor: pointer;
    height: 175px;
    line-height: 175px;
    position: absolute;
    text-align: center;
    width: 175px;

    /* css3 shadow */
    -moz-box-shadow: inset 0 0 20px #555555;
    -webkit-box-shadow: inset 0 0 20px #555555;
    -ms-box-shadow: inset 0 0 20px #555555;
    -o-box-shadow: inset 0 0 20px #555555;
    box-shadow: inset 0 0 20px #555555;
}
Step 3. JS
Now, the most interesting step – the game code (as jQuery plugin):
js/main.js
// This is a JavaScript event. It means - once DOM is finished loading,
// execute everything inside the callback function scope
// This is where we initialize the game
$(document).ready(function() {
    // Initialize the game and create the plugin

    // When the squares swap places, the moving square must always appear on top
    var zi = 1; // We increment z-index each time a square is shifted

    // The index of the empty square by default, the 16th square
    var EmptySquare = 16;

    // Now, this is where we create the plugin and call it fifteen.

    $.fn.extend({ fifteen:

        function(square_size) {
            // Grab the id of the HTML element into which we are placing the game,
            // it is the selector - "#game_object" from  $("#game_object").fifteen(175);
            var gameObjectElement = '#' + $(this).attr('id');

            var sqSize = square_size + 'px';
            var boardSize = (square_size * 4) + 'px';

            // Inject DIV into game_object, this is our game board
            $(gameObjectElement).html('<div id="board"></div>');

            $('#board').css({ position:'absolute', width: boardSize, height: boardSize, border: '1px solid gray' });

            // Populate the game board's HTML container with 15 squares
            for (var i = 0; i < 16; i++) {
                // A dirty way to create an arbitrary DIV and append it into HTML dynamically
                // Notice each square uses the same image. It just uses a different x/y offset for each square
                $('#board').append("<div style='left: " + ((i % 4) * square_size) + "px; top: " + Math.floor(i / 4) * square_size + "px; width: " + square_size + "px; height: " + square_size + "px; background-position: " + (-(i % 4) * square_size) + "px " + -Math.floor(i / 4) * square_size + "px '></div>");
            }

            // Empty up the 16th square, as the starting point
            // EmptySquare = 16
            $('#board').children("div:nth-child(" + EmptySquare + ")").css({backgroundImage: "", background: "#ffffff"});

            // Attach click event to each square
            $('#board').children('div').click(function() {
                Move(this, square_size);
            });
        }
    });

    // Move() is the function that is called when a square is clicked
    // Note that it is independent of the plugin itself which is described above
    // It takes two parameters,
    //     1. object handle to the square that was clicked, and
    //     2. the width of the square
    function Move(clicked_square, square_size) {
        // We need to locate movable tiles based on where the empty spot is,
        // We can only move the four surrounding squares
        var movable = false;

        // Swap x/y between the clicked square and the currently empty square
        var oldx = $('#board').children("div:nth-child(" + EmptySquare + ")").css('left');
        var oldy = $('#board').children("div:nth-child(" + EmptySquare + ")").css('top');

        var newx = $(clicked_square).css('left');
        var newy = $(clicked_square).css('top');

        // The clicked square is north of the empty square
        if (oldx == newx && newy == (parseInt(oldy) - square_size) + 'px')
            movable = true;

        // The clicked square is south of the empty square
        if (oldx == newx && newy == (parseInt(oldy) + square_size) + 'px')
            movable = true;

        // The clicked square is west of the empty square
        if ((parseInt(oldx) - square_size) + 'px' == newx && newy == oldy)
            movable = true;

        // The clicked square is east of the empty square
        if ((parseInt(oldx) + square_size) + 'px' == newx && newy == oldy)
            movable = true;

        if (movable) {
            // Increment zindex so the new tile is always on top of all others
            $(clicked_square).css('z-index', zi++);

            // Swap squares... Animate new square into old square position
            $(clicked_square).animate({ left: oldx, top: oldy }, 200, function() {
                //Move old square into new square position
                $('#board').children("div:nth-child(" + EmptySquare + ")").css('left', newx);
                $('#board').children("div:nth-child(" + EmptySquare + ")").css('top', newy);
            });
        }
    }

    // Ok, we're ready to initialize the game, let's do it.
    // Create a game with 175 by 175 squares inside "#game_object" div:
    $('#game_object').fifteen(175);
});
I tried to explain the code to the best of my ability here but some details were skipped because there is so much more to JavaScript.
If you feel like you still need to understand what some of the things mean I recommend grabbing a copy of my jquery tutorial book [2] which contains a multitude of tutorials and visual diagrams. They are designed to help you build your understanding of JavaScript and jQuery so you can write your own plugins, games, etc.
Live Demo
download in package
Conclusion
I hope you enjoyed this tutorial and perhaps learned a thing or two. Thanks for reading!
Greg Sidelnikov
via Script Tutorials»Script Tutorials | Web Developer Tutorials | HTML5 and CSS3 Tutorials http://www.script-tutorials.com/how-to-create-a-game-using-jquery/
Comentaris
Publica un comentari a l'entrada