A Guest Post by Xavier Burgin from QTL Images.
Professional or amateur, all photographers can agree shooting during the magic hour can produce aesthetically amazing results. Landscape photography especially shines during this period, but the magic hour is not restricted to landscape alone. Amazing portraits can be captured during these brief, beautiful times of the day.
Before you sprint out with a client, couple, or model there are a few things you should keep in mind to help you produce the best quality image during this period. For beginners, the magic hour is the first and last hour of sunlight during the day. The appeal of magic hour (or golden hour as some call it) stems from the warm glow, soft light, and saturated colors this time of day provides.
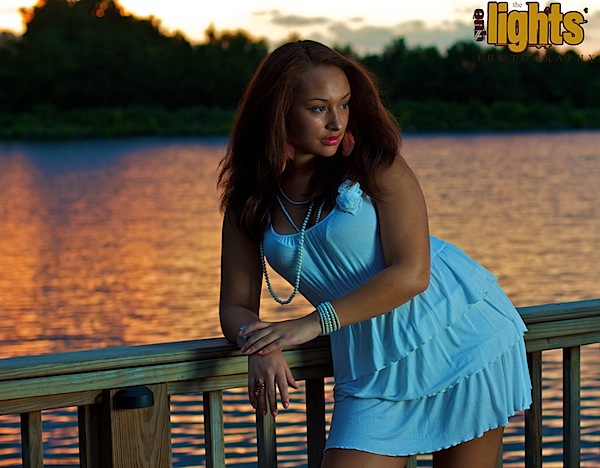
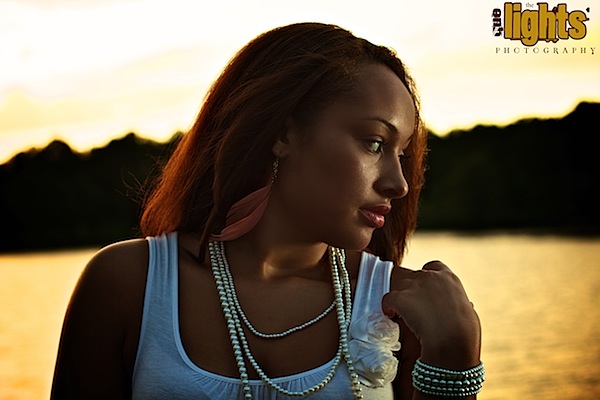
Still, like nighttime portrait photography, your camera alone may not capture images fully encompassing your subject along with the landscape. Expose for your subject, and the extra light could eliminate the visceral effect of magic hour as your portrait’s background. Expose for the landscape, and you could leave your subject in silhouette. This can give you great images, but you’re going for a picture where both foreground and background are well lit.
This is where off camera lighting comes into play. Using an extra off camera strobe or flash will allow you to expose for the background, while properly lighting your subject with simultaneously. I conducted a photoshoot with a close friend and model to demonstrate. Here a few guidelines.
1. Check Your Time
Magic hour happens at sunset and sunrise. At the most, you have an hour to shoot your best images. Go to a Sunrise/Sunset Calculator Site to ensure you know the exact time either will begin. Don’t guess. This could cause you to miss precious shooting time and force you to wait until later that day or in the morning.
2. Get There Early
Once you know your location and have calculated the time, get there thirty minutes early with your client. This will allow you breathing room before magic hour begins and perform a few test shots. Magic Hour comes and ends quickly. Don’t waste time.
3. Bring an Assistant

My assistant holding the off camera flash and softbox
If you’re going to use an off camera light set up it’s best to bring an assistant to hold and adjust your equipment. Alternatively, you could use a sandbag or something heavy to steady your set-up, but in rugged terrain or windy situations, an assistant on set will be your safest route.
4. Expose for the Background, Light The Subject with Your Flash

If you’ve made it to this point, great! You’re only a few steps away from a great photograph. Wherever the most dynamic range of colors in the sky reside, place your subject near. Find blocking which is suitable and complimentary towards your subject. Now, expose for the background. Adjust your F-Stop or Shutter Speed, whichever suitably leaves your background with its full array of colors or suits your taste. Then shoot a few test shots to properly expose (with your off camera lighting set up) your subject. Finally, take that moment defining photograph!
Following these steps will provide you with great images capturing both your subject and the landscape. Enjoy your time shooting!
Xavier Burgin is a current student at USC’s Graduate Cinematic Arts Program studying cinematography. He also freelances as a photographer. You can find his work at QTL Images and his blog at Que The Lights. To ask him any questions contact him via twitter @QueTheLights or Facebook.
Post originally from: Digital Photography Tips.
Check out our more Photography Tips at Photography Tips for Beginners, Portrait Photography Tips and Wedding Photography Tips.
Shooting at Magic Hour With an Off Camera One Light Set Up
via Digital Photography School http://digital-photography-school.com/shooting-at-magic-hour-with-an-off-camera-one-light-set-up?utm_source=feedburner&utm_medium=feed&utm_campaign=Feed%3A+DigitalPhotographySchool+%28Digital+Photography+School%29
Your Sharing information is very valuable. It is helpful for me. Thank you very much for your sharing.
ResponEliminahow to remove clothing wrinkles in photoshop