Passa al contingut principal

How to shoot Black Objects on Black Backgrounds

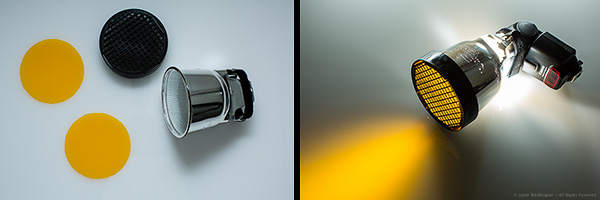
In my last post, I talked about using a DIY blue gel to add interest to a portrait by lighting the background. This time I’ve added a DIY orange gel, and used the same Gary Fong Powersnoot for some product photography. This is a three-light setup.


Photo of a Canon EOS 5D MkIII on a black background


Exposure: 1/200, f/14, ISO 100

Camera: Canon EOS 5D MkII

Lens: Canon EF24-70mm f/2.8L @ 60mm


When shooting a dark colored object against a dark background, one challenge is that the edges of the object tend to get lost in the background. Here are two ways to deal with this:


1. Light the background to add separation. This it the technique I used in my last post.


2. Use rim lighting to clearly define the edges of the object, as shown in the photo above.


The key to this kind of rim lighting is hard, directional light, so that the light goes exactly where you want it, and nowhere else. Good lighting is often about what not to light, as much as it is about what to light.


Set Diagram


Photo lighting diagram


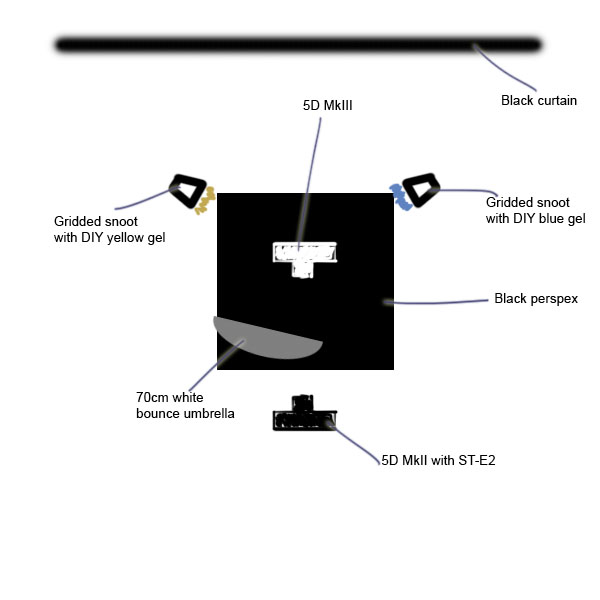
Main Light: Canon 430EX II @ 1/2 power into 70cm white bounce umbrella just outside the frame to camera left


Rim Lights: 2 x Canon 430EX II @ 1/2 power into Gary Fong Powersnoots with grids a back left and right


I triggered the flashes with the Canon ST-E2.


Gary Fong Powersnoot with DIY orange gel


Background: Black curtain about 1.5 meters behind the camera. The distance is important. If the background is too close, it will pick up some light from the main source and not appear totally black. Get your background cloth as far away as possible if you’re going for a pure black background.


The camera is sitting on a small square of black plexiglass (aka perspex) that I picked up at a local home improvement store.


Start With the Rim Light


To get the orange and blue highlights and the reflection right, I started with the gridded snoots. I shot a few frames and made small adjustments until I was happy with the look. Then I added the main light. It helps to build your lighting set up piece by piece.


Setup photo showing only the rim light


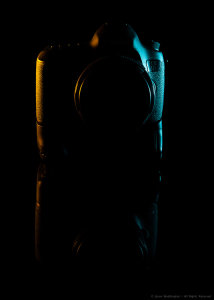
Once I was happy with the rim lighting, I added the main flash, in the 70cm umbrella. Here I was looking for two things. First I wanted a nice catchlight on the lens. Second, I wanted enough light on the 5D logo on the top right side of the camera body. The umbrella is located just outside the frame on the left side, a little above, and angled down toward the 5D MkIII.


You don’t need a lot of space for a shot like this – I made this photo in my living room. The perspex is sitting on the coffee table, and the black curtain is draped over our TV.


I hope this article has given you a few useful ideas for lighting black objects against black backgrounds. I’d love you hear your comments, and as always, feel free to contact me on Facebook or Google+.


Post originally from: Digital Photography Tips.


Check out our more Photography Tips at Photography Tips for Beginners, Portrait Photography Tips and Wedding Photography Tips.


How to shoot Black Objects on Black Backgrounds


via Digital Photography School http://digital-photography-school.com/how-to-shoot-black-objects-on-black-backgrounds?utm_source=feedburner&utm_medium=feed&utm_campaign=Feed%3A+DigitalPhotographySchool+%28Digital+Photography+School%29

Comentaris

  1. Your information has no comparison. It is very helpful for beginners. many many thanks sharing for your valuable tips. Best wish for you.

    how to remove clothing wrinkles in photoshop

    ResponElimina

Publica un comentari a l'entrada

Entrades populars d'aquest blog

10 alternativas a Cuevana para ver películas online

10 alternativas a Cuevana para ver películas online : Durante este último tiempo, en Cuevana se sucedieron varios “problemas” por los cuales hubo que ajustar algunas cosas antes de tiempo (como el rediseño del sitio), que dejaron a algunos usuarios ciertos problemas para acceder a las películas o series del portal. Pero realmente esto es algo que no incumbe a los usuarios y, como sabemos, existen muchas otras alternativas a Cuevana dando vueltas por Internet, que intentaremos presentar aquí mismo. Los sitios que repasaremos funcionan del mismo modo que Cuevana, mediante la instalación de un plugin que permite visualizar los videos de Megaupload o WUShare, entre otros servicios, en una calidad de imágen realmente excelente. Tal como sucede con el más popular servicio, todos ellos tienen publicidad que en algunos casos resulta insoportable, pero como dice Federico en DotPod “a caballo regalado no se le miran los dientes”. Alternativas a Cuevana 1. Moviezet Posiblemente el mejor clon d

Sitio alternativo a Cuevana: Moviezet

Sitio alternativo a Cuevana: Moviezet : Nadie se quiere enfrentar al monstruo Cuevana , tan popular por estos días que es casi imposible ver tu serie favorita o tu película sin tener problema de saturación de tráfico. Pero hay proyectos muy sanos y prometedores, sobre todo porque están basados como una muy buena alternativa . Señores estamos hablando obviamente de un sitio alternativo a Cuevana, llamado Moviezet. Como bien dijimos, Moviezet es una excelente alternativa a Cuevana, ya que podremos ver películas y series de forma gratuita sin necesidad de que existan cortes – al mejor estilo Megavideo – y que podremos tener un seguimiento, es decir, si miramos una serie, podremos ver toda la lista con los capítulos disponibles. Lo que tiene de novedoso este sitio web Moviezet , es que tiene películas y series que quizá en Cuevana no se puedan conseguir, pero atención, que puede suceder lo mismo, pero al revés. Entonces aquí intervenimos nosotros y te daremos un sabio consejo, para no

Learn Composition from the Photography of Henri Cartier-Bresson

“Do you see it?” This question is a photographic mantra. Myron Barnstone , my mentor, repeats this question every day with the hopes that we do “see it.” This obvious question reminds me that even though I have seen Cartier-Bresson’s prints and read his books, there are major parts of his work which remain hidden from public view. Beneath the surface of perfectly timed snap shots is a design sensibility that is rarely challenged by contemporary photographers. Henri Cartier-Bresson. © Martine Franck Words To Know 1:1.5 Ratio: The 35mm negative measures 36mm x 24mm. Mathematically it can be reduced to a 3:2 ratio. Reduced even further it will be referred to as the 1:1.5 Ratio or the 1.5 Rectangle. Eyes: The frame of an image is created by two vertical lines and two horizontal lines. The intersection of these lines is called an eye. The four corners of a negative can be called the “eyes.” This is extremely important because the diagonals connecting these lines will form the breakdown