Introduction
This tutorial has been transcribed from the SLR Lounge Lightroom 4 Workshop on DVD, a 14 hour Lightroom 4 A – Z guide with over 130 tutorials for mastering Lightroom from start to finish. The Digital download can be purchased from SLR Lounge while the physical copy is available through Amazon Prime.
Overview
The way an image is post-produced can drastically change the mood and feel of that image. We often take pictures that would look great in color, black and white or even with vintage effects. Virtual Copies are great for creating duplicates of an image with different develop settings applied to them. In this tutorial, we will go over the basics of Virtual Copies in Lightroom 4 and how they differ from Snapshots.
What is a Virtual Copy?
Virtual Copies are not copies of the original RAW file (that’s actually what makes them so awesome to begin with). Instead, a virtual copy is only a copy of the develop settings, represented as a new image within the Lightroom catalog. When you export the image, Lightroom will create outputted images based on each virtual copy of a particular image. Virtual Copies are great because they do not take up much space on the hard drive since only the settings of the photo are saved within the catalog. However, once you export these images out from Lightroom, they will take up more space because Lightroom is creating different versions of the original image.
Creating Virtual Copies
There are several ways to create a virtual copy of an image. We can right-click on an image and hit “Create Virtual Copy.”
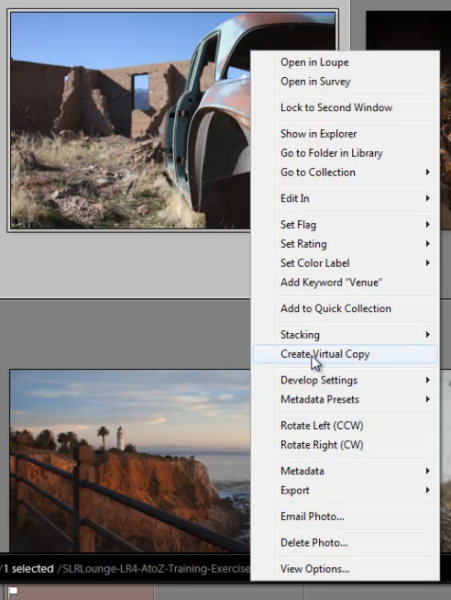
But, my favorite method is simply to use the shortcut. To create a Virtual Copy at any point hit (Ctrl + ’) on the desired image.
Filtering and Deleting Virtual Copies
At times, it might be beneficial to view all the Virtual Copies within our Lightroom catalog. To aid us, we can actually filter by Virtual Copies in Lightroom. First, you need to bring up your Filter Menu. To do this, you need to be in the Library Module. Once there, hit “\” to bring up the Filter Menu. Click on “Attribute” and on the far right of the panel there are 3 little box icons. To select Virtual Copies, click on the middle box, as shown below. Once you turn this filter on, you can see all the Virtual Copies in your catalog.

Filtering by Virtual Copies is very handy if say you wish to clear out all of your Virtual Copies in your catalog. Often times I also like to filter by Virtual Copies when I want to create a “universal look” with the develop settings for all of my Virtual Copies.
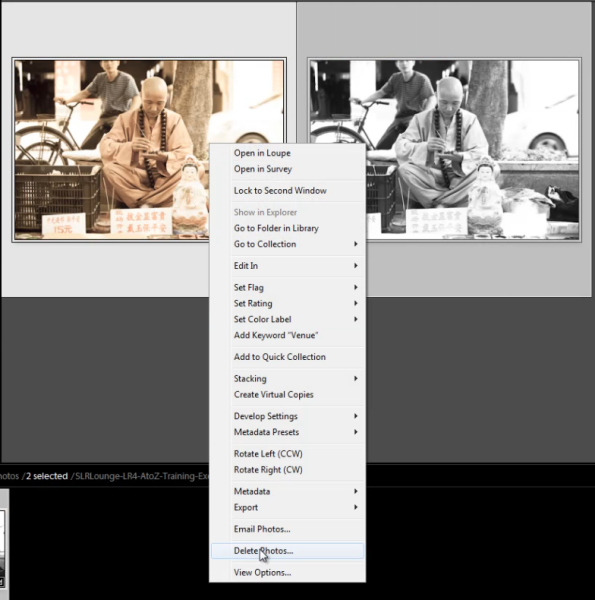
Remember, if you delete a Virtual Copy, the original file with the original settings will still be in your catalog. Deleting a Virtual Copy has no effect over the original image. Delete Virtual Copies the same way you would a regular image, simply right-click on the images, and hit “Delete Photos.”
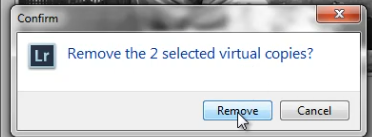
A dialogue box will then appear, asking if you want to remove the Virtual Copies. Once again, this will not remove your original image from your catalog (so long as the original image isn’t selected for deletion).
Virtual Copies vs. Snapshots
We are often asked what the difference is between a Snapshot versus a Virtual Copy. Given that both functions are used to create different looks for an image, it can seem similar. However, in reality, these two functions are very different, particularly when it comes to exporting.
When you create different looks via Snapshots, only the “active” or selected Snapshot develop settings will be exported to the final image. Let’s illustrate with an example.
Let’s say we have an image with 3 different looks created with Snapshots, and another image with 3 different looks created with Virtual Copies.
When we export the image with the 3 different Snapshots, Lightroom will create one exported image with the develop settings from the “active” snapshot.
When we export the image with the 3 different Virtual Copies, Lightroom will actually create 3 separate exported images using the develop settings from each Virtual Copy.
To keep it simple. Virtual Copies will create additional exported images while Snapshots will not.
Learn More with the Lightroom 4 Workshop Collection!
This was a sample tutorial from the Lightroom 4 A to Z DVD which is one of the DVDs in the Lightroom 4 Workshop Collection. A collection of nearly 30 hours of video education teaching everything from Lightroom basics to advanced raw processing techniques.
The LR4 Workshop Collection also includes the critically acclaimed Lightroom 4 Preset System which is designed to enable users to achieve virtually any look and effect within 3-5 simple clicks. From basic color correction, vintage fades, black & white effects, tilt-shift effects, faux HDR, retouching, detail enhancing, and so much more. Click the links above to learn more.
Post originally from: Digital Photography Tips.
Check out our more Photography Tips at Photography Tips for Beginners, Portrait Photography Tips and Wedding Photography Tips.
Lightroom 4 Virtual Copies 101
via Digital Photography School http://digital-photography-school.com/lightroom-4-virtual-copies-101?utm_source=feedburner&utm_medium=feed&utm_campaign=Feed%3A+DigitalPhotographySchool+%28Digital+Photography+School%29
Thank you very much for your sharing. It is very helpful. Absolutely, it is helpful for me.
ResponEliminahow to remove clothing wrinkles in photoshop
background removal service