Passa al contingut principal

A quick look at colour correction in Lightroom 4 Beta

A quick look at colour correction in Lightroom 4 Beta:

Exciting news yesterday as Adobe released the first public beta for Lightroom 4. Lots of people have been asking me what has changed since LR3? is it worth upgrading? etc. Based on my first impressions there are some big name changes such as the Map & Book modules, and then there are the incremental changes in the Develop module.


I’m sure in time that both the Map & Book modules will become an important part of our workflow, but for me, I am more excited by the changes to the Basic panel and the Adjustment Brushes.


LR3 and LR4 Beta Basic panels


As you can see from the screenshot above.. Fill Light, Recovery & Brightness have been replaced with Highlights, Shadows and Whites. This is not just a change of titles but how each slider works.. for example, even the Exposure slider now functions differently. I must say that although there is a small learning curve associated with these changes I am really pleased with the results they produce.


Anyway, on to the meat of this post..


one of most annoying things to deal with in post production is trying to colour correct an image with mixed light sources. In LR3, there was a workaround where you could paint the contrasting colour to warm or cool a part of the image but this was based on colour knowledge and guesswork.


Lightroom 4 Beta has a better solution..


This image has mixed light sources


As you can see in the image above, there are 2 sources of light in the image. The church is lit by warm lights while the cooler light from the windows can be seen in the background.


Changing the White balance sliders would never produce a ‘correct’ white balance so we need to look at another solution.


Adjustment Brush panel


Clicking on the Adjustment Brush (as indicated by the blue arrow) brings up the new and improved local adjustment panel. The big changes here are the Noise slider and the White Balance sliders. With these changes it is now possible to paint on colour correction.


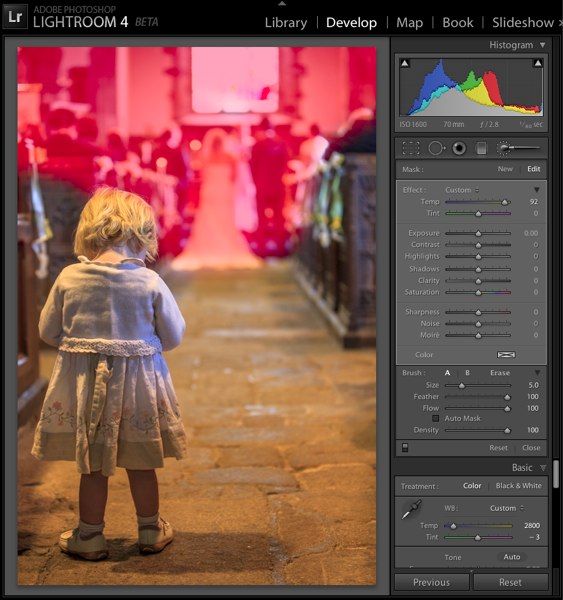
Paint the Adjustment Brush where you want to colour correct


Paint on the image with the Adjustment Brush, using the keyboard shortcut ‘O’ to display the mask. I have painted the mask where I want the colour correction to take place. Make sure at this point that all of the sliders are set to zero, press the ‘O’ shortcut to hide the mask.


Now change the Temp and Tint sliders to colour correct the image..


Colour corrected background


As you can see I have warmed up the background of the photo using the Temp slider to a value of 92 in this instance. It is as simple as that!


I went on to increase the colour temperature of the little girl and boost the highlight values to help her stand out a little from the background..


Colour correcting the foreground


The final before and after image is below
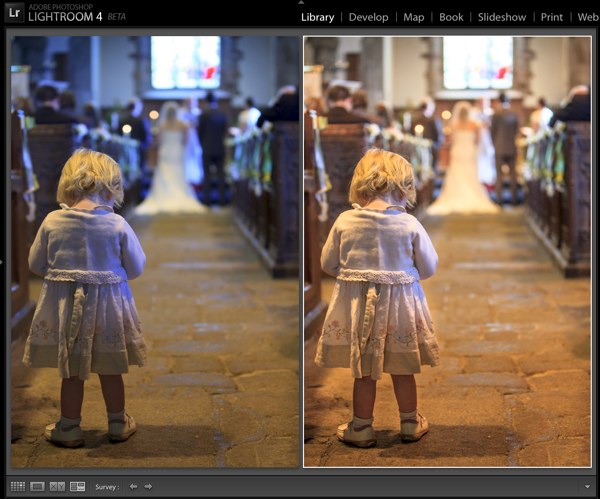

Before and After


I hope you have found this little look into the Lightroom 4 Beta helpful and if you have any questions please ask them in the comment section below.


The Lightroom 4 Beta is available to download from the Adobe Labs web site. It is worth understanding that this is not the final version of the software and therefore subject to change. I would also advise that if you want to try the LR4 Beta, that you use copies of your images rather than your original files.


Till next time..


Comentaris

Entrades populars d'aquest blog

10 alternativas a Cuevana para ver películas online

10 alternativas a Cuevana para ver películas online : Durante este último tiempo, en Cuevana se sucedieron varios “problemas” por los cuales hubo que ajustar algunas cosas antes de tiempo (como el rediseño del sitio), que dejaron a algunos usuarios ciertos problemas para acceder a las películas o series del portal. Pero realmente esto es algo que no incumbe a los usuarios y, como sabemos, existen muchas otras alternativas a Cuevana dando vueltas por Internet, que intentaremos presentar aquí mismo. Los sitios que repasaremos funcionan del mismo modo que Cuevana, mediante la instalación de un plugin que permite visualizar los videos de Megaupload o WUShare, entre otros servicios, en una calidad de imágen realmente excelente. Tal como sucede con el más popular servicio, todos ellos tienen publicidad que en algunos casos resulta insoportable, pero como dice Federico en DotPod “a caballo regalado no se le miran los dientes”. Alternativas a Cuevana 1. Moviezet Posiblemente el mejor clon d

Sitio alternativo a Cuevana: Moviezet

Sitio alternativo a Cuevana: Moviezet : Nadie se quiere enfrentar al monstruo Cuevana , tan popular por estos días que es casi imposible ver tu serie favorita o tu película sin tener problema de saturación de tráfico. Pero hay proyectos muy sanos y prometedores, sobre todo porque están basados como una muy buena alternativa . Señores estamos hablando obviamente de un sitio alternativo a Cuevana, llamado Moviezet. Como bien dijimos, Moviezet es una excelente alternativa a Cuevana, ya que podremos ver películas y series de forma gratuita sin necesidad de que existan cortes – al mejor estilo Megavideo – y que podremos tener un seguimiento, es decir, si miramos una serie, podremos ver toda la lista con los capítulos disponibles. Lo que tiene de novedoso este sitio web Moviezet , es que tiene películas y series que quizá en Cuevana no se puedan conseguir, pero atención, que puede suceder lo mismo, pero al revés. Entonces aquí intervenimos nosotros y te daremos un sabio consejo, para no

Learn Composition from the Photography of Henri Cartier-Bresson

“Do you see it?” This question is a photographic mantra. Myron Barnstone , my mentor, repeats this question every day with the hopes that we do “see it.” This obvious question reminds me that even though I have seen Cartier-Bresson’s prints and read his books, there are major parts of his work which remain hidden from public view. Beneath the surface of perfectly timed snap shots is a design sensibility that is rarely challenged by contemporary photographers. Henri Cartier-Bresson. © Martine Franck Words To Know 1:1.5 Ratio: The 35mm negative measures 36mm x 24mm. Mathematically it can be reduced to a 3:2 ratio. Reduced even further it will be referred to as the 1:1.5 Ratio or the 1.5 Rectangle. Eyes: The frame of an image is created by two vertical lines and two horizontal lines. The intersection of these lines is called an eye. The four corners of a negative can be called the “eyes.” This is extremely important because the diagonals connecting these lines will form the breakdown