Silver Efex Pro Control Points – An Apology:
In one of my previous tutorials on Silver Efex Pro I may have given the impression that I wasn’t too impressed with control points, I think I may even have used the phrase “I don’t think the control points work very well in SilverEfex and never use them!” Oh dear, what a muppet. I was, of course, wrong and its not very often you’ll hear me say that according to my wife and I apologise for misleading you. That isn’t to say that they are a panacea but they are pretty damn good.
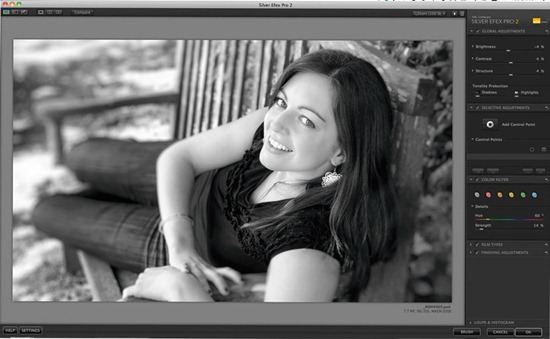
Image 1 shows a pretty much finished image, I’ve done all the necessary in Photoshop and I’ve just about got the image to how I want it in Silver Efex but it needs just a tad more refining. I need to draw the eye to the face more and the best way to do this is through light as the eye is drawn to light areas in an image. We are going to achieve these finishing touches using control points.
Control points are found in the Selective Adjustments panel and are applied via the big button found there.

When you click the button your mouse arrow should change to a kind of cross-hairs which you click on the area you want to play with. As with other Nik products the control point selects similar tones/colours (even with a black & white image it uses the underlying colour image as its reference) in a feathered circle radiating from where you click. Image three shows how a control point looks normally while adjusting the size of the “circle of influence” (this circle is only visible when adjusting its size).

By selecting the check box under the show mask button in the Selective Adjustments panel as shown in image 4 you reveal what is actually being affected by the control point as we see in image 5.


I can see that most of the face is being caught and that there is some fade off into the bench and onto the arms which I can live with for the time being. You may have noticed that whole of the face isn’t affected by the control point; this is because of the differences in tonality of the face. In image 6 you can see that I’ve added two more control points so that most of the face is covered

You may have also noticed that I haven’t made any adjustments with these control points yet and I probably won’t as these points are going to anchor the tone of the face while we alter all the other areas they sort of become “anti-control points”.
Now all we need to do is to go around adding control points to darken the surrounding areas, not forgetting that because the control points affect similar tones, not necessarily everything covered by one control will be altered. I’m only using the brightness slider on the control point but there are options for contrast, structure, amplify blacks, amplify whites, fine structure and selective colour. If you can’t see all of the options as in image 7 just toggle the triangle at the bottom of the stalk to extend or collapse the options.

In the Selective adjustments dialog box there are options to group and ungroup control points. To do this cmd or alt click on the group icon, this after this all the control points will act in the same way and will all be altered as one via any of the control point controls. There is also a copy control point option which will copy a selected control point that can then be dragged dropped to wherever you wish. Finally there is the delete button which is pretty self-explanatory (don’t forget that individual control points can be turned off via the check box to the left of the control point name).

Once I’ve added all the control points that I need to (image 9) I need to add a finishing touches to get the photograph to how I want it to look.


In one of my previous tutorials on Silver Efex Pro I may have given the impression that I wasn’t too impressed with control points, I think I may even have used the phrase “I don’t think the control points work very well in SilverEfex and never use them!” Oh dear, what a muppet. I was, of course, wrong and its not very often you’ll hear me say that according to my wife and I apologise for misleading you. That isn’t to say that they are a panacea but they are pretty damn good.
Image 1 shows a pretty much finished image, I’ve done all the necessary in Photoshop and I’ve just about got the image to how I want it in Silver Efex but it needs just a tad more refining. I need to draw the eye to the face more and the best way to do this is through light as the eye is drawn to light areas in an image. We are going to achieve these finishing touches using control points.
Control points are found in the Selective Adjustments panel and are applied via the big button found there.
When you click the button your mouse arrow should change to a kind of cross-hairs which you click on the area you want to play with. As with other Nik products the control point selects similar tones/colours (even with a black & white image it uses the underlying colour image as its reference) in a feathered circle radiating from where you click. Image three shows how a control point looks normally while adjusting the size of the “circle of influence” (this circle is only visible when adjusting its size).
By selecting the check box under the show mask button in the Selective Adjustments panel as shown in image 4 you reveal what is actually being affected by the control point as we see in image 5.
I can see that most of the face is being caught and that there is some fade off into the bench and onto the arms which I can live with for the time being. You may have noticed that whole of the face isn’t affected by the control point; this is because of the differences in tonality of the face. In image 6 you can see that I’ve added two more control points so that most of the face is covered
You may have also noticed that I haven’t made any adjustments with these control points yet and I probably won’t as these points are going to anchor the tone of the face while we alter all the other areas they sort of become “anti-control points”.
Now all we need to do is to go around adding control points to darken the surrounding areas, not forgetting that because the control points affect similar tones, not necessarily everything covered by one control will be altered. I’m only using the brightness slider on the control point but there are options for contrast, structure, amplify blacks, amplify whites, fine structure and selective colour. If you can’t see all of the options as in image 7 just toggle the triangle at the bottom of the stalk to extend or collapse the options.
In the Selective adjustments dialog box there are options to group and ungroup control points. To do this cmd or alt click on the group icon, this after this all the control points will act in the same way and will all be altered as one via any of the control point controls. There is also a copy control point option which will copy a selected control point that can then be dragged dropped to wherever you wish. Finally there is the delete button which is pretty self-explanatory (don’t forget that individual control points can be turned off via the check box to the left of the control point name).
Once I’ve added all the control points that I need to (image 9) I need to add a finishing touches to get the photograph to how I want it to look.


Comentaris
Publica un comentari a l'entrada